
Restoring Antique Shadowbox Frames at Home: A Step-by-Step Guide
Quick Summary
Restoring antique shadowbox frames at home means assessing damage first, cleaning gently with distilled water, repairing loose corners, rebuilding chips in thin layers, then regilding, toning and sealing with reversible materials. Work in a ventilated space, and stop if lead paint may be present.
- Photograph the frame from several angles before removing anything or starting repairs.
- Clean with a lightly dampened cloth and distilled water, and never soak the wood.
- Use wood glue and clamps to fix loose corners, checking diagonals until the frame sits square.
- Build up chips and missing molding in thin layers, since thick fills crack as they dry.
- Test a lead swab first, and seek a conservator's advice if the result is positive.
Table of Contents
- What You Need Before You Start: Tools, Materials and Safety
- Step 1: Assessing Frame Damage and Shadowbox Depth
- Step 2: How to Clean an Old Wooden Frame Safely
- Step 3: Repairing a Loose Picture Frame Corner
- Step 4: Filling Chips, Rebuilding Molding and Matching Patina
- Step 5: Regilding, Antiquing and Sealing the Finish
- Protecting Glass, Backing and Specimens with Archival Materials
- When to Book an Antique Picture Frame Restoration Professional
- Frequently Asked Questions
What You Need Before You Start: Tools, Materials and Safety
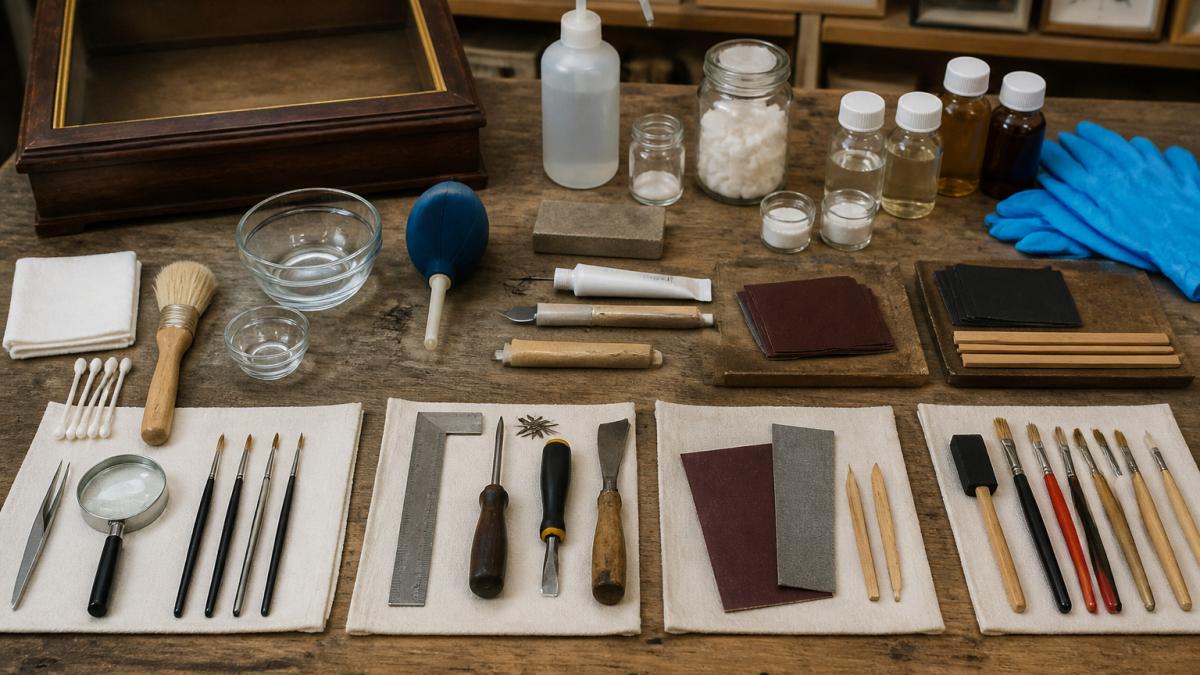
Before you touch an antique shadowbox frame, set up a workspace that separates clean handling from dusty or solvent-heavy work. A folding table covered with a clean cotton sheet, a second small table for wet materials, and a task lamp with a daylight bulb (around 5000-6500 K) will let you see colour and surface faults that warm household lighting hides.
Core hand tools and consumables
- Soft cotton cloths, cotton swabs and a soft-bristled brush (a clean, dry 25 mm sash brush works well for dusting carved surfaces)
- Fine-grit abrasive papers in 320, 400 and 600 grit, wrapped around a cork or rubber sanding block
- A thin palette knife and a plastic putty knife
Conservation-grade materials
- Gesso: ready-mixed acrylic gesso is convenient, but traditional rabbit-skin glue gesso is more sympathetic to antique plaster and remains reversible. Most practitioners find a thin rabbit-skin gesso build-up is easier to sand back without damaging original gilding.
- Fillers: paper clay or a fine-grained chalk-and-glue putty for gesso losses; two-part epoxy wood filler only for structural wood repairs, never for decorative surface fills.
- Adhesives: a reversible conservation adhesive such as a methyl cellulose paste or a PVA that remains water-reversible. Avoid polyurethane glue on antique frames, it foams, stains and is effectively permanent.
Safety basics for an Australian workshop
- Work in a ventilated space, an open garage door or a room with cross-flow is better than a closed study. Solvent vapours are heavier than air, so work at bench height rather than on the floor.
- Wear a P2-rated respirator when sanding gesso, plaster or old paint, and nitrile gloves when handling solvents, strippers or old finishes. Safety glasses are sensible when clipping or prying.
- Keep a fire blanket and a suitable extinguisher within reach. Oily rags and solvent-soaked cloths can self-heat; store used cloths in a metal bin with a tight lid and empty it at the end of each session.
Step 1: Assessing Frame Damage and Shadowbox Depth
Start by looking at the frame closely before you clean or repair anything.
Next, check the depth of the shadowbox itself. The rear backing, the spacers and the glass all contribute to the box's structural integrity.
Press gently on each corner and along the sides.
Before any cleaning or repair, you can judge how much work a frame needs using these checks.
| Check | What to look for | Why it matters |
|---|---|---|
| Chips and cracks | Gesso or wood damage | Record the original state first |
| Loose joints | Movement or creaking at corners | Strain grows with box depth |
| Shadowbox depth | Heavy specimens in a deep box | Puts extra load on corners |
| Corner pressure | Press gently on each corner and sides | Movement signals a repair is needed |
Step 2: How to Clean an Old Wooden Frame Safely
Cleaning comes before any repair, because dirt and grime can hide cracks and make glue adhesion harder. For a fuller guide, see cleaning shadowbox frames specifically. Work slowly and keep the wood as dry as possible.
- Remove the glass, backing and contents, and set them aside in a safe place.
- Dust the frame with a soft brush to lift loose dirt.
- Dampen a cotton cloth lightly with distilled water and wipe a small test area.
- If the test area stays intact, clean the rest of the frame in gentle, short strokes.
- Dry the frame immediately with a clean, dry cloth.
Avoid soaking the wood, since water can swell joints and lift old gesso. Never use household cleaners on antique finishes.
Step 3: Repairing a Loose Picture Frame Corner
A loose corner is one of the most common faults in antique frames. Repair it before you attempt any cosmetic work.
- Carefully separate the joint by hand. If it resists, stop and do not force it.
- Scrape out old glue from both surfaces with a thin blade.
- Apply a thin, even layer of wood glue to both faces.
- Reassemble the corner and clamp it square. Check the diagonals with a tape measure.
- Wipe away any squeeze-out with a damp cloth and leave the clamps in place for the time the glue manufacturer recommends.
Once the glue has cured, check that the frame sits flat and the corner is firm.
Step 4: Filling Chips, Rebuilding Molding and Matching Patina
Small chips and missing sections of gesso or plaster can be rebuilt with care. Work in thin layers, since thick fills crack as they dry.
- For small chips, use wood filler or paper clay, pressed in and levelled with a putty knife.
- For missing molding, build up the shape in layers and sand it back once dry.
- Allow each layer to dry and cure fully before adding the next.
Patina matching is about blending the repair into the surrounding finish. Use a fine brush and a small amount of antiquing glaze or dark wax, then wipe back until the repair sits comfortably with the older surface.
Step 5: Regilding, Antiquing and Sealing the Finish
Regilding works best on small areas. Apply a base coat, allow it to dry, then add gilt cream or rub 'n buff with a soft cloth, buffing gently.
Once the gilding is complete, apply an antiquing glaze or dark wax to tone down new areas so they blend in.
Urania ripheus Moth in a Frame →
Seal the frame with a clear, reversible finish suitable for antique wood, applying thin coats and allowing each to dry.
Protecting Glass, Backing and Specimens with Archival Materials
Most restoration guides stop at the frame.
Original glass: keep, clean or replace?
Antique shadowboxes often carry original glass with a slight green or grey cast, bubbles, or a hand-rolled waviness.
- Clean original glass with a soft, lint-free cloth and a small amount of pH-neutral glass cleaner sprayed onto the cloth, never onto the glass. You can also read how to clean glass display covers safely. Avoid ammonia-based cleaners, which can attack old putty, gilding and some frame finishes.
- Check the glass for chips at the edges. A small chip can be stabilised with a conservation-grade clear adhesive applied from the reverse, but cracked glass should be replaced with a cut-to-size piece of the same thickness.
- If you replace glass, keep the original in a labelled, padded box stored flat. Future owners or a conservator may want it.
Backing and spacers: the hidden risk
- Use a backing board labelled as acid-free and lignin-free, ideally buffered for paper and textile contents. Check which materials are truly acid-free for insect mounting before you buy. Products described as "conservation grade" are a reliable starting point.
- Separate the contents from the backing with a layer of acid-free tissue or a sheet of washed cotton muslin.
- Replace old foam spacers with Volara foam or Ethafoam, both of which are chemically stable and do not crumble into the box. Cut them slightly oversize so they hold the glass and backing without rattling.
- Seal the back of the frame with a breathable dust cover, an acid-free paper or a washed cotton dust jacket, rather than taping the backing directly to the frame. This keeps dust out while allowing the contents to breathe.
Reversible mounting: the museum-quality principle
The single most important rule for shadowbox contents is reversibility.
- Avoid double-sided tape, hot-melt glue, superglue and any adhesive applied directly to a specimen, document or textile. These fail, stain and are effectively permanent.
- Use mechanical mounts instead: custom-cut Ethafoam cradles for three-dimensional objects, polyethylene strapping or linen tape passed through slots in an acid-free board for flat items, and Melinex or polyester film pockets for documents.
- Where a textile must be supported, stitch it to a washed cotton backing with loose, long stitches in fine cotton thread, never through the front face, and never with synthetic thread that can cut the fibres.
- Photograph the mount before you close the box so that a future owner can see exactly how the object was held.
Moisture and display
Keep the display out of direct sunlight and away from damp rooms, external walls and kitchens. Our guide to preventing fading in shadowbox displays covers light protection in more detail. Find out whether insect displays fade over time and what guards against it.
Australian Institute for the Conservation of Cultural Material (AICCM), find a conservator and read conservation guidance
When to Book an Antique Picture Frame Restoration Professional
Some jobs are better left to a specialist. Seek professional help if the frame has structural cracks that run through the wood, if the gesso or gilding is very old and fragile, or if the frame or contents may be valuable.
For everything in between, a careful home restoration can bring an antique shadowbox back to life. Explore our current range at Newman Art Designs.
Frequently Asked Questions
How do you clean an antique shadowbox frame?
Start with a soft, dry brush or a clean microfibre cloth to lift surface dust, working from the top of the frame downwards. Avoid spraying liquids directly onto the frame or the glass, because moisture can seep into the joins and lift old gilt. For stubborn grime on sealed wood, use a barely damp cloth with a few drops of mild soap, then dry it immediately. Keep the specimen area closed off and never let cleaning liquids reach the interior. If the frame has gilding or a fragile surface, test any product on an inconspicuous corner first.
Can you restore an antique frame without removing its original finish?
Often yes. Many original finishes can be cleaned, stabilised and touched up in place rather than stripped. Gentle cleaning, a light consolidant on flaking areas and careful toning of small losses can preserve the original surface. Where a finish is badly damaged, a reversible approach such as a removable wax or glaze is preferable to permanent stripping. Keeping original material is usually the better choice for the value and character of an antique piece.
What should you use to fill small chips in a wooden frame?
For small chips in gesso or plaster mouldings, a fine gesso or a paper clay compound works well because it sands smoothly and accepts paint or gilt. For bare wood, a tinted wood filler matched to the timber is suitable. Apply thin layers, allow each to cure fully, and sand lightly before toning. Choose products that can be sanded and that will not shrink or yellow noticeably over time, so the repair stays discreet and reversible.
When should you take an antique frame to a professional restorer?
Consider a professional when the frame has structural failure, significant missing ornament, water damage, or original gilding that is flaking across large areas. A specialist is also worth engaging when the frame holds valuable or fragile specimens, as the shadowbox depth and glazing need careful handling. For anything that may affect the value or authenticity of an antique piece, seek advice from a qualified conservator before making permanent changes.

