
How to Repair Loose Shadowbox Frame Corners at Home
Last Updated: November 4, 2026
Quick Summary
To repair loose shadowbox corners, remove the glass, backing and specimen, clean out old glue, apply wood glue, and clamp the joint square. Check both diagonals, front and back, until the frame is true before the glue cures. Fix small gaps early, since a corner that is visibly moving needs attention before it separates completely.
- Remove the glass, backing and specimen before touching the joint.
- Clean old glue and debris from the mitred joint and let it dry fully.
- Use corner jigs or band clamps with blocks for deep shadowbox frames.
- Measure both diagonals at the front and back to confirm the frame is square.
- Choose reversible reinforcement on antique frames and test it on a hidden spot.
Table of Contents
- Tools and Materials You Will Need for the Repair
- Removing the Glass, Backing and Specimen Safely
- Cleaning Old Glue and Debris from the Mitered Joints
- Choosing the Best Wood Glue for Picture Frames
- How to Clamp Mitered Corners and Check for Squareness
- Filling Gaps in Wood Frames and Reinforcing the Corners
- Reassembling Your Shadowbox and Booking a Restoration Check
- Frequently Asked Questions
Loose corners are one of the most common problems with a shadowbox frame, so knowing how to repair loose shadowbox joints early can save the piece. For broader restoration context on older frames, see the full step-by-step antique restoration guide.
The usual signs are easy to spot once you know what to look for:
- A visible gap where two mitred pieces meet
- A corner that sits higher or lower than its neighbour
- A frame that rocks slightly when pressed on one corner
- Glass or backing that rattles or shifts inside the frame
- Fine cracks in the paint or finish near a joint
Watch out: do not wait until a corner separates completely. Once the joint opens, the specimen and glass can shift, and the frame may need more than a simple re-gluing.
Fix a small gap as soon as you notice it, since a timely repair loose shadowbox job is far simpler than a full rebuild. To learn how sunlight and display conditions affect the frame and specimen, read about preventing fading in shadowbox display cases.
An older frame may have a fragile finish or original glue more brittle than modern adhesive. Work gently and test your methods on a hidden spot first.
The advice is simple: check your shadowbox corners every few months, and act at the first sign of movement.
Tools and Materials You Will Need for the Repair
You do not need a workshop to repair a loose corner. A small set of basic tools handles most jobs.
Gather these before you start:
- Wood glue suited to frame joints
- Corner clamps or a band clamp
- A soft cloth and a small brush for cleaning
- A thin craft knife or scraper to lift old debris
- Fine sandpaper, around 180 to 220 grit
- Wood filler or wood putty for small gaps
- A set square or framing square to check alignment
- A tape measure for diagonal checks
- A staple gun or fine brads if you reinforce the back
Keep your workspace clean and well lit. Lay down an old towel or sheet so glue drips do not stain the table.
Check the label for open time and clamping time before you buy.
Removing the Glass, Backing and Specimen Safely
Before you touch the joint, take the contents out. This step protects the specimen and the glass, and it gives you clear access to the corner.
Work slowly and in good light:
- Lay the frame face-up on a soft, flat surface.
- Release the retaining points or clips holding the backing board.
- Lift the backing board away and set it aside.
- Lift the glass out by its edges, never by the middle.
- Support the specimen with a clean, rigid board as you move it.
Handle delicate specimens with care. Wear clean cotton gloves or wash your hands, and avoid touching fragile wings, legs or skin.
Store the glass and backing flat and safe while you work, and keep every small part together so nothing gets lost.
If you plan to ship the frame or its contents, the same care applies. Our guide on how to ship delicate specimens safely walks through each handling step.
Cleaning Old Glue and Debris from the Mitered Joints
Glue will not hold on dirt or old residue. Clean the joint properly before you add anything new.
Remove loose dust with a soft brush, then use your craft knife or scraper to lift any dried glue or debris from the joint.
For a clean bond, follow these steps:
- Scrape away any hardened glue inside the gap
- Brush out dust and fibres from the seam
- Wipe with a damp cloth and allow full drying
- Lightly sand the faces of the joint to open the grain
An old finish may flake during cleaning. Antique finishes are especially fragile, so avoid strong solvents. Test any cleaner on a hidden spot first, and stop if the finish starts to lift.
Choosing the Best Wood Glue for Picture Frames
The right glue makes a big difference. Most frame repairs use a standard wood glue, which bonds well to the grain and sets firmly.
Consider these factors when you choose:
- Open time: how long you have to position the joint before the glue sets
- Clamping time: how long the joint must stay clamped
- Gap filling: some glues handle small gaps better than others
- Reversibility: important for antique pieces you may need to open again later
For a shadowbox, a glue with a reasonable open time gives you room to align the corner.
If you are unsure which product to buy, ask a hardware or woodworking supplier for a glue suited to frame joints, and follow the manufacturer's instructions closely.
How to Clamp Mitered Corners and Check for Squareness
Clamping is where the repair becomes a success or a failure, and a shadowbox makes it harder than a flat frame.
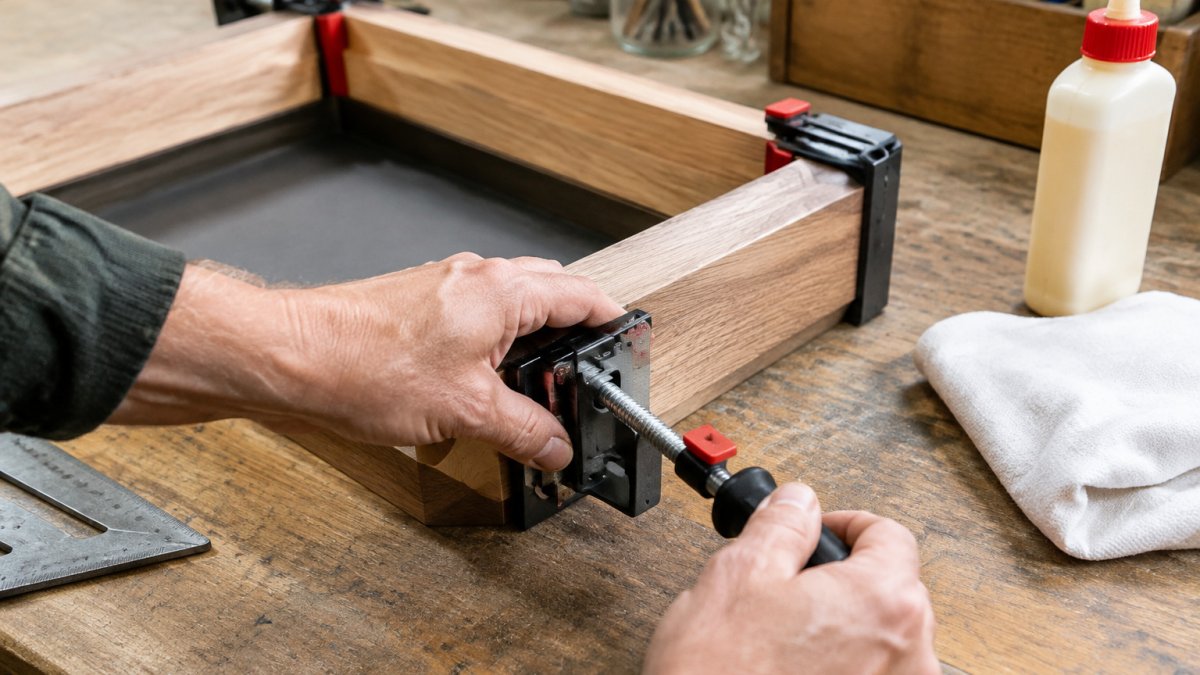
Apply a thin bead of wood glue to both faces of the joint first. Bring the two pieces together and align the outer edges by eye and by feel. Then choose a clamping method that suits the depth of your frame:
- Corner clamps with deep jaws: use these only if the jaws span the full depth of the moulding. If the jaws grip only the front edge, the back of the joint will stay open.
- Band clamp with corner blocks: place small triangular blocks of scrap wood over each corner before running the band. The blocks spread the band's pressure across the full depth of the profile and stop the band riding up the sides.
- Bar or pipe clamps across the frame: for very deep shadowboxes, two bar clamps laid flat across opposite corners, with padded cauls protecting the finish, pull the joint square and tight without relying on the outside profile.
- A simple corner jig: cut two pieces of scrap timber to form an L that matches the outside corner, clamp the frame into the L, and the jig holds the joint square while a single clamp pulls it closed. This is the most reliable method for deep frames because the jig, not the clamp, controls alignment.
Whichever method you use, tighten gently at first, then firm up until the joint closes with no visible gap along its full depth.
Check squareness straight after clamping:
- Measure the two diagonals from corner to corner.
- If the diagonals match, the frame is square.
- If they differ, loosen the clamp slightly and adjust the frame.
- Recheck until the diagonals are equal, then tighten fully.
On a deep frame, measure diagonals at both the front and the back.
Wipe away squeezed-out glue while it is still wet, since dried glue can affect the finish later.
Watch out: do not overtighten the clamp.
Filling Gaps in Wood Frames and Reinforcing the Corners
Some corners need more than glue.
For small gaps, use a wood filler or wood putty that matches the frame colour.
Reinforcement is where most guides reach straight for nails and staples. Those work, but they are permanent, and on a fragile or valuable shadowbox a reversible repair is often the better choice. Consider these options in order of invasiveness:
- Reversible internal bracing: cut a small timber block or an L-shaped brace that fits inside the back of the corner, and glue it in place with a reversible adhesive such as a conservation-grade PVA or a hide glue. The brace adds real strength, and a conservator can later remove it without damaging the original joint.
- Flat corner braces on the inside edge: screw a flat metal or timber brace to the inside face of the frame where it will not show. Use pilot holes, and keep the screws short so they do not break through the front or the visible side.
- Brads or fine nails through the back: drive a small brad through the back of the frame, angled into the joint. This is effective and invisible from the front, but it is permanent, so reserve it for frames where the back is not historically significant. Always drill a pilot hole to avoid splitting the wood.
- A glued block across the back of the joint: the traditional method, and still one of the strongest. Use a block that spans both sides of the mitre and glue it with a reversible adhesive if the frame is antique.
On a fragile antique finish, gold leaf, gesso, delicate veneer, avoid anything that clamps, screws or nails through the decorated surface.
Keep reinforcement on the back or inside so the front stays clean. Drill pilot holes for nails to avoid splitting the wood.
Reassembling Your Shadowbox and Booking a Restoration Check
Once the glue has cured and the corners are solid, you can rebuild the shadowbox. When you are ready to display it again, our complete guide to styling glass domes offers ideas for arranging the finished piece.
Check the frame once it is back on the wall; a stable, level frame shows the repair worked.
For larger repairs, an antique piece, or a shadowbox with a valuable specimen, a professional conservator or frame restorer can give you extra peace of mind.
Once the repair is done, use this summary to check the key points before rebuilding the frame.
| Stage | Key action | Watch for |
|---|---|---|
| Remove contents | Lift glass and backing by edges, support specimen | Fragile wings, legs or skin |
| Clean joint | Scrape old glue, brush out dust, wipe dry | Finish flaking on antiques |
| Choose glue | Wood glue labelled for woodworking or joinery | Foaming or swelling glues |
| Clamp joint | Use deep jaws, corner blocks or a jig | Overtightening that cracks wood |
| Check squareness | Measure both diagonals, front and back | Twist that pulls joint apart later |
| Reinforce | Use reversible or back-of-frame bracing | Braces that foul the backing board |
Frequently Asked Questions
What is the best adhesive for repairing wooden shadowbox corners?
For most loose shadowbox corners, a PVA wood glue designed for joinery works well because it bonds strongly to timber, dries clear and stays workable long enough to align a mitered joint. Choose a glue labelled for woodworking rather than a general craft adhesive, and apply it thinly to both faces of the joint. Avoid cyanoacrylate (superglue) on large joints, as it sets too quickly and can make the frame brittle. Allow the glue to cure fully before removing clamps, usually several hours, and check the manufacturer's directions for your product.
How do you clamp a mitered frame corner without a professional vice?
A simple strap clamp or a pair of corner clamps will hold a mitered corner firmly without a professional vice. Place a scrap of cardboard or cork between the clamp and the wood to prevent marking. Tighten gradually, checking that the corner stays square as pressure builds. A homemade corner jig made from offcuts of timber and a square also works well. Whichever method you use, keep even pressure on the joint so the glue line closes without gaps.
Can I fix a loose shadowbox corner without removing the glass?
In most cases you should remove the glass and backing before repairing a corner, because glue can seep onto the glass, pressure can crack it, and the specimen inside may be disturbed. Working with the glass removed also lets you check the joint from both sides and reach the corner properly. If the frame is only lightly loose and you choose a non-destructive reinforcement, such as a discreet corner bracket on the rear, you may avoid full disassembly, but a full repair is more reliable.
How do you fill gaps in mitered frame corners?
Once the glue has cured, small gaps can be filled with a wood filler or a wood putty matched to the frame colour. Press the filler firmly into the gap with a putty knife, slightly overfilling it, then sand flush once dry. For larger gaps, a sawdust and glue paste often gives a better colour match than commercial filler. Test any filler on an offcut first, and apply a finish or touch-up stain so the repaired corner blends with the rest of the frame.

