
How to Display Shadowbox Frames in Small Apartments
Table of Contents
- Why Shadowbox Frames Suit Compact Living Spaces
- How to Arrange Shadow Boxes on a Wall Without Overcrowding
- Renter-Friendly Picture Hanging Methods That Protect Your Bond
- Shadow Box Shelf Display Ideas for Limited Floor Space
- Lighting, Glare and Viewing Angles in a Small Room
- Common Mistakes When Displaying Shadowbox Frames in Apartments
- Conclusion
- Frequently Asked Questions
Last Updated: October 20, 2026
Why Shadowbox Frames Suit Compact Living Spaces
A shadowbox frame is a deep picture frame with a glass front and enough interior depth to hold three-dimensional objects, not just flat photos. That depth is exactly why it earns its place in a small apartment.
At Newman Art Designs, we have spent years helping people house delicate pieces in frames built to protect them. Here is the thing most guides miss: in a compact living space, the frame is doing two jobs at once.
What Makes a Shadowbox Frame Different
A standard picture frame holds a flat print. A shadow box holds real objects. The key measurements are:
- Interior depth: how far back the box goes, which sets what will fit
- Glass front: keeps dust off your memorabilia
- Backing: the board behind your items, which you can cover or paint
- Frame size: the outer footprint, which matters when wall space is tight
That extra depth is the whole point. It lets you mount medals, figurines or a preserved specimen without squashing them against glass.
Choosing Keepsakes That Fit the Frame Depth
Measure your items before you buy anything. A deep frame swallows bulky keepsakes. A shallow one suits flat pieces like photographs or pressed flowers.
Match the object to the box:
- Flat items (photos, tickets, letters): any depth works
- Mid-depth items (medals, small figurines): a box with a few centimetres of clearance
- Bulky pieces: a genuinely deep frame, measured against the object's widest point
Leave a small gap between the item and the glass. It stops rubbing and keeps the glass clean.
How to Arrange Shadow Boxes on a Wall Without Overcrowding
The best wall arrangement uses fewer frames than you think. Two or three well-spaced shadow boxes read as a gallery. Six crowded together read as clutter. In a small room, restraint is the styling rule that does the most work.
Start with a paper template. Trace each frame onto cardboard, cut it out, and tape the shapes to the wall. Move them around before you commit to a single nail hole.
Plan the Wall Around Your Floor Plan, Not Just the Frames
Most guides tell you how to hang a frame. Few tell you where a frame belongs in a tight layout. Walk the room and map the walls you actually see from the places you sit, cook and sleep.
Use this quick placement audit before you hang anything:
- Sightlines from the sofa or bed. Mark the wall directly opposite your main seat. That is your prime display wall, because you will look at it every day.
- The wall beside a doorway. A slim vertical stack fits a narrow strip that furniture cannot use.
- Above a low console or bookcase. This uses vertical space without adding floor footprint.
- The back of a door or a deep reveal. A small frame can sit on a hook behind a door where nothing else fits.
Measure the wall first. Note the width between the skirting and any light switch, then keep your arrangement inside that clear zone. A frame that overlaps a switch or a door swing looks accidental and gets knocked.
Scale, Grouping and Negative Space
Scale is where small apartments are won or lost. A single oversized shadow box on a small wall can dominate the room. A cluster of tiny frames on a large wall looks lost. Match the total frame area to roughly a third of the wall you are decorating, and leave the rest empty.
Grouping rules that hold up in compact rooms:
- Odd numbers read better. Three frames in a loose row feel more natural than two or four.
- Anchor the group with one larger piece. Let the biggest frame lead and arrange smaller ones around it.
- Keep gaps consistent. A gap of a few centimetres between frames looks deliberate. Uneven gaps look accidental.
- Leave breathing room at the edges. Keep at least a hand's width between the outer frame and the corner or ceiling.
Negative space is not wasted space. In a small room, empty wall makes the frames you do hang feel considered rather than crammed.
Layouts That Work on a Narrow Wall
Narrow walls reward simple layouts. Try these:
- The vertical stack: two or three frames centred in a single column. Ideal for a slim wall beside a door.
- The single statement: one larger shadow box as the focal point, with clear space around it.
- The symmetrical pair: two frames side by side, aligned at the top. Calm and easy to get right.
- The shelf-and-wall mix: one hung frame above a floating shelf that holds a second frame. This doubles your display without doubling the wall coverage.
Keep spacing consistent. A gap of a few centimetres between frames looks deliberate. Uneven gaps look accidental.
Renter-Friendly Picture Hanging Methods That Protect Your Bond
Renters need picture hanging methods that leave no lasting damage.
Adhesive strips are the first option for lightweight frames. They hold well on smooth, painted walls and lift off cleanly when removed slowly.
For heavier frames, removable wall hooks that use small pins are a good middle ground. They leave tiny holes that a dab of filler hides in seconds.
Morpho didius Butterfly in a Frame →
Check the Real Weight Before You Choose a Fixing
Weight is where renter setups fail. A glass-fronted frame with a specimen inside is heavier than it looks. Weigh the finished frame on a kitchen scale, then add a margin of at least half again for safety. A frame that weighs 1 kg needs a fixing rated well above 1 kg, because knocks and door slams add load.
Match the fixing to the wall as well as the weight:
- Smooth painted plasterboard: adhesive strips work well for light frames, provided the paint is sound and the surface is clean.
- Textured or freshly painted walls: adhesive strips grip poorly. Wait for paint to cure fully, or use a pin hook instead.
- Brick or masonry: small pin hooks are unreliable. Use a removable masonry hook rated for the load, or ask your property manager before drilling.
- Timber studs: the most secure option. Find a stud with a stud finder and fix directly into it for anything heavy.
Stop a Deep Frame From Tipping
Shadow boxes are deeper than picture frames, so they sit further off the wall and tip more easily. Two habits keep them stable:
- Use two fixing points. D-rings spread the load better than a single hook, and they keep the frame sitting flat against the wall.
- Add a bottom spacer. A small adhesive bumper on the lower back edge stops the frame rocking and keeps it parallel to the wall.
For a frame on a shelf or console, lean it back against the wall at a slight angle and place a non-slip mat underneath. Never lean a deep frame forward, and keep it away from the edge where a passing hip can catch it.
Removing Fixings Without Losing Your Bond
At moving time, remove adhesive strips slowly and steadily rather than pulling them off at an angle. Stretch the tab down along the wall, not out from it. If a strip resists, warm it gently with a hairdryer to soften the adhesive. Patch any pin holes with a little filler and a touch of matching paint, and photograph the wall once it is clear.
Shadow Box Shelf Display Ideas for Limited Floor Space
Shelf displays solve the floor-space problem outright. A shadow box does not need a wall at all. It can stand upright on a shelf, a console table or a bedside table, which makes it perfect for compact living.
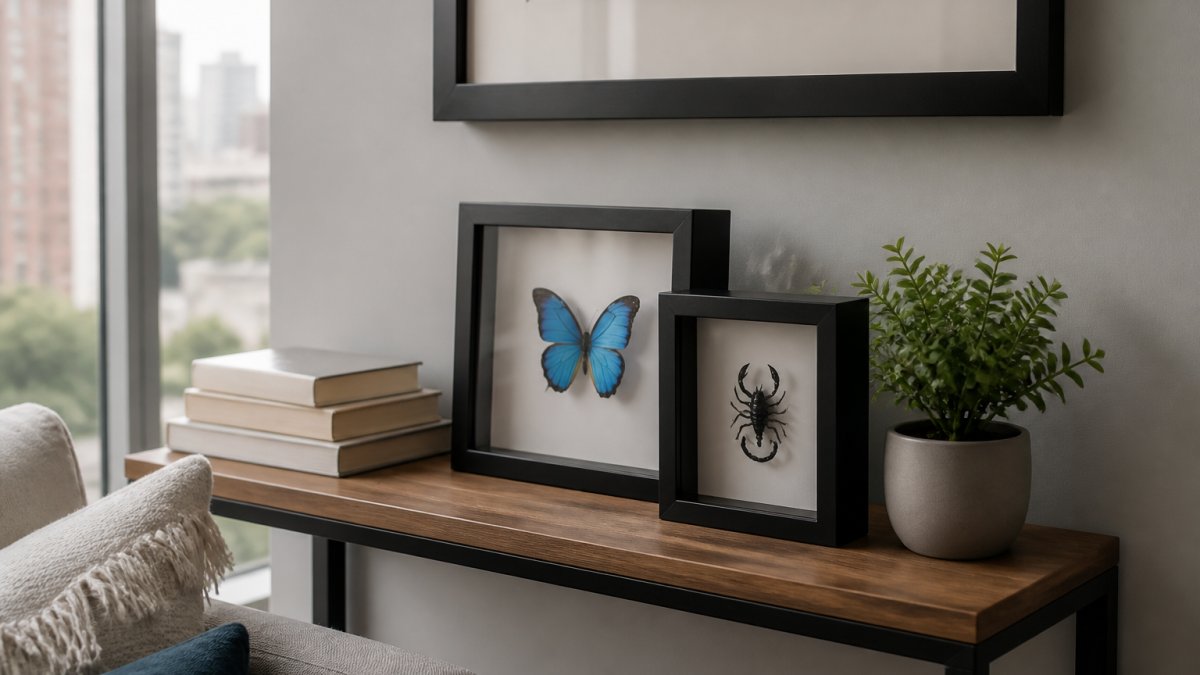
Our 8" x 10" Morpho didius butterfly frame and our 6" x 6" coiled snake skeleton frame both suit a tabletop spot. Small footprints, big impact.

Tabletop, Console and Bedside Placements
Where you place a frame changes how it reads. A few placements that work:
- Console table: lean one or two frames against the wall behind, layered with a small plant.
- Bedside table: a single small frame turned to face the bed. A calm, personal touch.
- Floating shelf: mount a shelf high on a wall to use vertical space you are not otherwise using.
- Bookcase: stand a frame among books for a collected, lived-in look.
Leaning frames against a wall is the renter's best friend. No hardware, no holes, and you can rearrange on a whim.
Lighting, Glare and Viewing Angles in a Small Room
Glare ruins a display faster than clutter. A glass front reflects whatever light hits it, so placement matters as much as the frame itself.
Keep frames away from direct sun. Strong light fades colours and can damage delicate specimens over time.
Think about your viewing angle. A frame at eye level reads best.
For pieces with shimmering colour, like our Papilio palinurus frame, the viewing angle genuinely changes what you see.
- Avoid facing a frame straight at a bright window
- Test the spot at different times of day
- Angle a leaned frame slightly to cut reflection
Common Mistakes When Displaying Shadowbox Frames in Apartments
Most display problems come from a handful of repeat mistakes. Here is what to avoid.
- Overcrowding the wall. Too many frames shrink a room. Fewer, spaced well, look better.
- Ignoring weight limits. Adhesive rated for a light frame will not hold a glass box.
- Hanging in direct sun. Fading and heat damage creep up slowly.
- Skipping the template. Guessing at layout leads to a wall full of holes.
- Forgetting the gap. Items pressed against glass rub and mark.
Conclusion
Displaying shadowbox frames in a small apartment comes down to a few good habits: measure your keepsakes, use templates before you drill, match your fixing to the real weight, and let a shelf or a lean do the work when wall space is tight.
If you want pieces made to be displayed this way, our frames are built for it. Newman Art Designs has offered museum-quality preserved specimens since 1996, with free shipping across Australia. Our frames are solid and ready to hang or lean.
Frequently Asked Questions
What is the safest way to hang shadowbox frames in a rental apartment?
Use removable adhesive strips rated above the frame's weight, or a single small nail into a stud where your lease allows it. Always check your tenancy agreement first. Keep frames under about 2 kg on adhesive strips and use two strips per frame for stability. For heavier pieces, a D-ring and wall anchor into a stud is safer than adhesive alone. Patch and repaint any holes before you move out to protect your bond.
How high should a shadowbox frame be hung?
Centre the frame at roughly eye level, about 145 to 155 cm from the floor to the middle of the frame. In a small apartment, hanging slightly lower works well because you often view the frame while seated. If you are grouping several shadowbox frames, treat the whole arrangement as one unit and centre that group at the same height rather than measuring each frame separately.
Can you display shadowbox frames on a shelf instead of hanging them?
Yes, and shelf display is often the better choice in a compact space. A narrow console table, floating shelf or bedside table can hold small shadowbox frames without any wall damage. Lean the frame back slightly against the wall for stability, or use a small picture stand. Keep frames away from direct sun so colours and specimens stay protected, and leave breathing room between pieces to avoid clutter.
How do you arrange several shadowbox frames without making a small room feel cluttered?
Limit yourself to three to five frames in one grouping and keep consistent spacing, around 5 to 8 cm between edges. Mix sizes but repeat one element, such as all black frames, so the group reads as one piece. Avoid filling every wall; leave empty space around the arrangement. Rotating pieces seasonally keeps the display fresh without adding more frames to a small room.
