
Museum Quality Butterfly Display Preservation Guide
Table of Contents
- What Museum Quality Butterfly Display Preservation Actually Means
- How to Preserve a Butterfly: Step-by-Step Instructions
- Butterfly Mounting Techniques for Delicate Wings
- Tools, Materials and Conservation-Safe Framing
- How to Protect Framed Butterflies from Fading
- Cleaning a Butterfly Display Without Causing Damage
- Troubleshooting Preservation Failures and Long-Term Monitoring
- Conclusion: Building a Display That Lasts for Decades
- Frequently Asked Questions
Last Updated: October 13, 2026
What Museum Quality Butterfly Display Preservation Actually Means
Museum quality butterfly display preservation is the practice of preparing, pinning and sealing a specimen so it stays intact and true to colour for decades, not months.
Most guides skip the hard parts. They show you a pretty frame and never mention that a butterfly left in direct sun will lose its colour within a few years. That is the gap this guide fills.
Below, we walk through every step, from relaxing a dried specimen to long-term monitoring, plus the mistakes that ruin displays.
How to Preserve a Butterfly: Step-by-Step Instructions
Preserving a butterfly takes five stages: rehydrate, pin, position, dry and mount. Each stage matters. Skip one and the wings will tear, droop or discolour.
Here is the full process at a glance:
| Stage | What Happens | Time Needed | Common Failure |
|---|---|---|---|
| Rehydrating | Soften dried joints | 24-72 hours | Wings snap when moved |
| Pinning | Secure thorax to board | 10 minutes | Specimen shifts while drying |
| Positioning | Spread wings flat | 15-30 minutes | Wings droop or overlap |
| Drying | Set the final shape | 1-3 weeks | Mould in humid rooms |
| Mounting | Seal into frame | 20 minutes | Dust and pests get in |
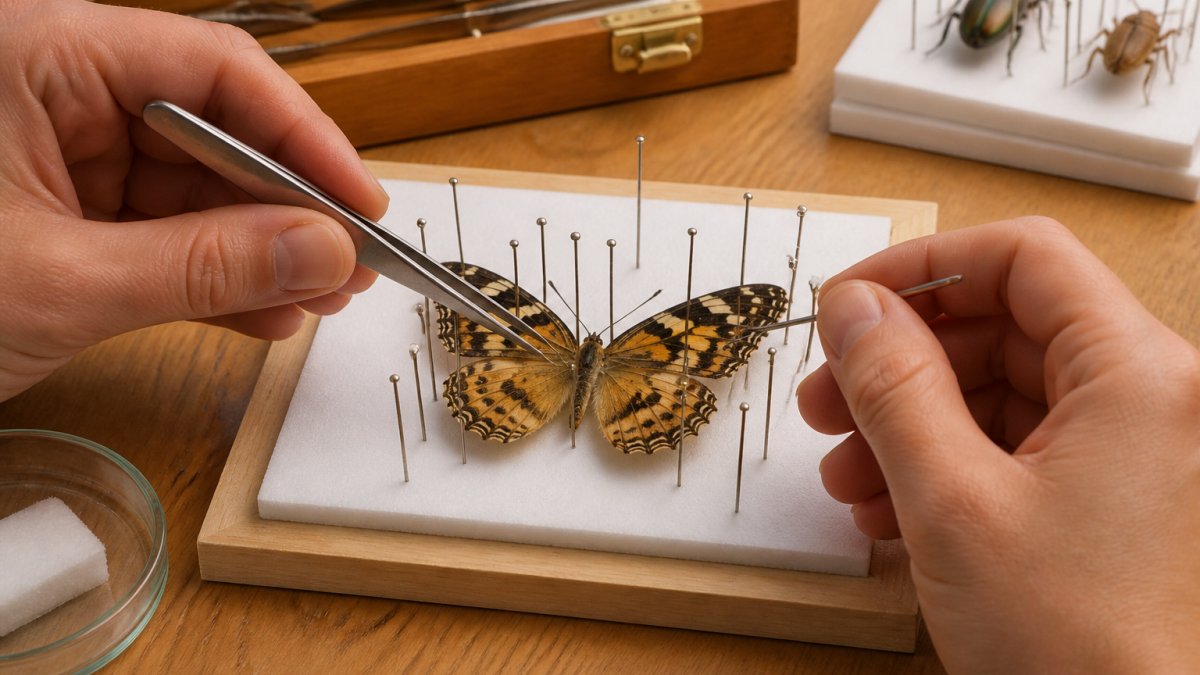
Relaxing and Rehydrating Dried Specimens
A dried butterfly is brittle. Force a wing and it snaps at the base. Rehydrating restores flexibility so the joints move without damage.
Place the specimen in a sealed container with damp paper towel or sand. Keep the specimen off the wet surface. Leave it for one to three days depending on size. Check daily. A relaxed butterfly's wings move freely with light pressure from a pin.
Drying, Setting and Pinning in Place
Pin through the thorax, not the wings. Push one entomological pin through the centre of the thorax and into the board. This holds the body steady while you work.
Then pin strips of paper or tracing paper across each wing to hold it flat. Do not pin through the wing itself. Leave the specimen to dry for one to three weeks in a dry, dust-free spot.
Butterfly Mounting Techniques for Delicate Wings
Wing positioning decides whether a display looks museum-grade or homemade. The goal is symmetry: both forewings level, both hindwings angled the same way, antennae straight.
Work slowly. Use fine tweezers, never fingers. If a wing resists, the specimen is not fully relaxed. Put it back in the relaxing chamber rather than forcing it.
Spreading Board Setup and Wing Positioning
A spreading board has a central groove for the body and sloped sides for the wings. Match the groove width to the specimen's body size. A body that sits too deep will droop.
Line the board with foam or cork so pins hold firm. Set the forewings first, then the hindwings. Bring the leading edge of each forewing level with the other. Check from above, not at an angle.
Tools, Materials and Conservation-Safe Framing
Conservation-safe framing means every material that touches or sits near the specimen is archival, and every fixing method is reversible. Reversibility matters because a future owner or conservator may need to remove the specimen from the mount without damaging it. If you glue a butterfly to a board, you have destroyed that option.
Work through the frame in layers, from the specimen outward.
Pins, boards and adhesives
- Entomological pins: stainless steel, in graduated sizes (roughly 000 to 3). Stainless resists corrosion; brass and nickel-plated pins can react with specimen proteins over decades. Never use sewing pins, they are too thick and not inert.
- Spreading board: foam or cork lined, with a central groove matched to the thorax width. Cork is traditional; closed-cell foam is cheaper but compresses over time.
- Relaxing chamber: an airtight container with damp paper towel or damp sand, plus a few drops of a mould inhibitor. Keep the specimen on a raised platform so it never contacts the wet surface.
- Adhesives: if you must fix a specimen, use a reversible, water-soluble archival adhesive such as methyl cellulose or a wheat-starch paste. Avoid cyanoacrylate (super glue), PVA craft glue and hot-melt, all are irreversible and can off-gas.
- Mounting board: acid-free, lignin-free, buffered mat board or foam board rated archival. Cheap cardboard and standard foam core release acids and lignins that yellow and stain wings.
Glazing: what actually blocks UV
Not all glazing is equal. Plain glass transmits most UV. Options, from least to most protective:
- Standard glass: no meaningful UV block. Fine only in a dark room.
- UV-filtering glass: typically blocks the majority of UV wavelengths while staying clear. The most common choice for framed specimens.
- Acrylic (perspex) with UV filter: lighter and shatter-resistant, useful for large or wall-hung pieces, but static can attract dust and it scratches more easily than glass.
- Museum glass: anti-reflective plus UV-filtering, the clearest viewing experience, and the most expensive.
Whichever you choose, the glazing should not touch the specimen. Leave an air gap so the butterfly is not pressed against the surface.
Frame construction and reversibility
- Shadow box depth: deep enough that the specimen and its pins clear the glazing. An 8" x 10" box is a common size for a single medium butterfly; larger specimens need more depth.
- Seal: a tight-fitting frame with a backing board reduces dust, pest and humidity ingress. A poor seal is the most common cause of internal dust and mould.
- Reversibility checklist: the specimen should be pinned (not glued), the backing should be removable, and no adhesive should touch the specimen itself. If all three hold, a conservator can later dismantle the mount without loss.
For a ready-made example, our Morpho didius butterfly in a frame uses an 8" x 10" black shadow box built to these standards, with archival backing and UV-protective glazing.

How to Protect Framed Butterflies from Fading
The single biggest cause of fading is direct sunlight. UV light breaks down the pigments and scales that give a butterfly its colour, and the damage cannot be reversed.
Morpho didius Butterfly in a Frame →
Keep displays out of direct sun. A wall away from windows is ideal. If a bright spot is the only option, use a frame with UV-protective glazing, which blocks most of the harmful wavelengths.
Other fading risks to control:
- Heat: keeps specimens near room temperature
- Humidity: avoid bathrooms and kitchens where steam builds up
- Handling: never open the frame to touch the specimen
Cleaning a Butterfly Display Without Causing Damage
Clean the outside of the frame only. The specimen inside should never be touched once sealed.
Dust the frame and glazing with a soft microfibre cloth. For glass, use a lightly dampened cloth, never a spray that could seep inside. Do not use solvents near the seals.
If dust has settled inside the frame, that points to a poor seal. Do not open it yourself. A loose wing or fallen pin needs a professional to reset it without causing more damage.
Troubleshooting Preservation Failures and Long-Term Monitoring
Most failures trace back to one cause, so start with the symptom, then fix the environment that produced it.
| Symptom | Likely Cause | Fix |
|---|---|---|
| Wings droop or curl | Pinned before fully relaxed | Rehydrate and re-pin |
| Colour fading | UV exposure | Move away from sun, add UV glazing |
| Mould spots | High humidity | Relocate to a dry room |
| Loose specimen | Weak pin or failed mount | Professional re-mount |
| Live pests | Poor seal | Freeze-safe treatment, reseal frame |
| Condensation inside glass | Temperature swings or high humidity | Move to a stable, drier room |
| Brittle, snapping wings | Very low humidity or age | Handle minimally; consult a conservator |
Measurable targets for display conditions
Rather than guessing, aim for these ranges. They are the same broad envelope most natural-history collections work within.
- Relative humidity: roughly 45-55%. Below about 40% wings become brittle; above about 65% mould risk rises sharply.
- Temperature: stable, around 18-22°C. Avoid rooms that swing widely, such as uninsulated garages or sunrooms.
- Light: keep UV exposure low. Direct sun is the worst case; even indirect bright light fades pigments over years. A wall away from windows is ideal.
- Handling: never open the frame. Every opening admits humidity, dust and pests.
How to monitor without expensive equipment
You do not need a lab. A few inexpensive tools will catch most problems early:
- A digital thermo-hygrometer placed near the display, checked monthly. Note the reading so you can spot drift.
- A UV torch or a UV test card to confirm your glazing is actually filtering. Cheap UV films and coatings vary widely.
- A visual inspection twice a year: look for colour shifts, condensation inside the glass, frass (fine dust) under the frame, or a specimen that has shifted on its pin.
- A pest check: small moths, carpet beetles and silverfish are the usual culprits. Sticky traps near (not inside) the display can confirm activity.
When to call a conservator
Some problems are not DIY. Call a professional if:
- The specimen has come loose from its pin or mount.
- Mould has spread beyond a small spot.
- Wings are brittle and at risk of snapping.
- The piece is valuable, rare or of sentimental importance.
A conservator can rehydrate, re-pin and re-mount without causing further loss, and can advise on whether the frame itself needs rebuilding.
Sourcing and legal checks
On sourcing, always buy from sellers who can show where specimens came from. Ethical, legally sourced butterflies come from licensed farms, not wild catches of protected species. In Australia, the relevant rules sit with the federal environment department and state wildlife authorities, and CITES permits apply to many international species. If a seller cannot explain the provenance, treat that as a red flag.
Conclusion: Building a Display That Lasts for Decades
Getting preservation right is fiddly, and one rushed step can undo weeks of careful work.
If you would rather skip the pins and spreading boards, Newman Art Designs does the hard part for you. Every piece is museum-preserved, sealed in a shadow box frame and shipped free across Australia. Choose from framed butterflies and other nature-inspired specimens, each built to last.
Shop now and bring a lasting piece of the natural world into your home.
Frequently Asked Questions
How do you preserve a butterfly for display?
Start by relaxing dried specimens in a sealed container with damp paper for one to three days until the wings move freely. Then pin the body in the spreading board groove, gently ease the forewings forward with entomological pins, and hold them with paper strips. Leave the specimen to dry for one to two weeks in a dust-free spot before mounting it in an archival shadow box.
How do you keep a framed butterfly from fading?
UV exposure is the main cause of fading, so hang displays away from direct sunlight and windows. Keep the piece out of rooms with high humidity or constant bright light.
How long does a preserved butterfly display last?
A properly preserved butterfly display can last decades or even centuries when kept in stable conditions. Key factors are low humidity, pest protection and minimal handling. A sealed frame gives the best long-term results, while displays near direct sunlight or damp walls deteriorate far sooner.
How do you clean a butterfly shadow box?
Never open the frame or touch the specimen. Dust the outside of the glazing with a microfibre cloth, and use a soft brush on the frame edges only. If dust has settled inside, a sealed frame prevents this, so avoid compressed air or liquids, which can damage delicate wings. For deeper cleaning, have a professional conservator service the piece.
